Fennel Salad with Green Apple and Parmesan
November 26, 2016 § Leave a comment

This salad made me a fan of fennel. Crunchy and has a fresh, sweetly musky taste similar to liquorice and anise. Paired with apple, it masks the licorice flavor (perfect for those not keen on its taste) and adds to the freshness of this salad. Packed with many health benefits from relieving anemia to improving eye care, this salad was my intro to this herb.
 Good as a side dish — I like it with fried or grilled meats.
In fact, it has opened the door to many more delicious Fennel recipes, which I will share with you eventually.
In the meantime, here’s the recipe adapted from Molly Wizenberg’s book, A Homemade Life.

What you need:
- 1 medium fennel bulb, about 10 ounces
- 1 small Green Apple
- Olive oil
- Lemon
- Sea Salt
- Parmigiano-Reggiano cheese
- Freshly ground black pepper
What you do:
Prepare the fennel:
- Cut off and discard the stalks and fronds.
- Using a vegetable peel or a small knife, trim away any bruises or brown spots on the bulb’s outermost layer of skin.
- Cut it in half from root to stalk, and trim the root end.
- Using a sharp knife or a mandolin and working with the one-half of the bulb at a time, slice the fennel very thinly, 1/8-1/4 inch thick. Set aside.
Prepare the Green Apple:
- Using an apple core, remove and discard core.
- Then cut the apple in half from top to bottom.
- Using a sharp knife or a mandolin, slice it very thinly, just like the fennel. Set aside.
Assembling the Salad:
- Make a layer of fennel slices. Drizzle lightly with olive oil.
- Then place a layer of apple on top of the fennel. Sprinkle lightly with lemon juice, and season with salt.
- Shave thin ribbons of cheese. Drizzle with oil.
- Repeat and finish with a good sprinkle of lemon juice, a generous splash of oil and a few shavings of cheese to garnish.
- Serve with salt and pepper to taste.
Waiting for Plums
June 22, 2015 § Leave a comment

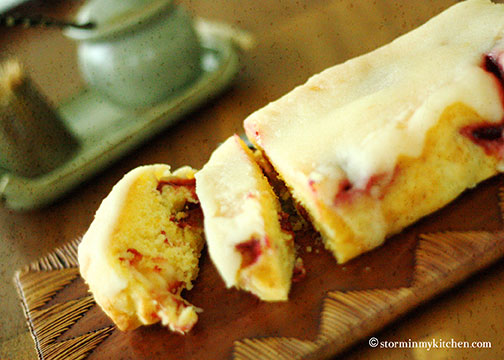
This is what you make when you have an overflow of plums. I love stone fruits, and friends and family know that. So when plums (or peaches and cherries) reach our soil, I sometimes end up with too much. When that happens, this cake will most likely end up in my oven.

A light, moist cake with a citrusy bite that’s great with tea, I served this to friends last year and it was a hit. Not a typical cake in my part of the world and because it was a hit, I thought that you’d like to try something different.
The rains have finally arrived. It was an unbearably hot summer this year and I welcome the downpours. I am still waiting for those plums to reach me but wouldn’t it be nice to stay in on a rainy day and while the time away with a Korean drama series that I’ve become addicted to?
Plum Cake (adapted from 33 Degrees)
You will need:
- 2 eggs, plus 1 extra egg yolk
- 140 grams butter softened
- 140 grams golden castor sugar
- 140 grams all-purpose flour
- 1 ½ teaspoon baking powder
- ½ teaspoon salt
- ½ teaspoon vanilla extract
- Grated zest and juice of 1 orange
- 200 grams plums, stoned, half roughly chopped into pieces and the other half cut into wedges.
For the topping:
- 1 tbsp fresh lemon juice
- 200 grams golden castor sugar
What You Do:
- Preheat your oven to 160ºC/fan oven 140ºC. Grease and line a 1kg loaf tin.
- Lightly beat the eggs, extra egg yolk and the vanilla extract.
- Beat the butter and sugar in a bowl until light and fluffy. You want the butter and sugar to lighten considerably for a good cake.
- Pour in the eggs a little at a time, beating well after each addition.
- Fold in the flour, baking soda, salt, orange zest, 2 tbsp of the juice and lastly the chopped plums.

- Spoon into prepared tin and scatter the plum wedges over the top.

- Bake until cake is golden or until an inserted skewer comes out clean, about 45 – 50 minutes.
- Let it cool for a few moments before turning out onto a wire rack.
- Mix the lemon juice and castor sugar with the remaining orange juice and pour over the cake.


Tuna Avocado and Feta Salad
July 16, 2014 § Leave a comment
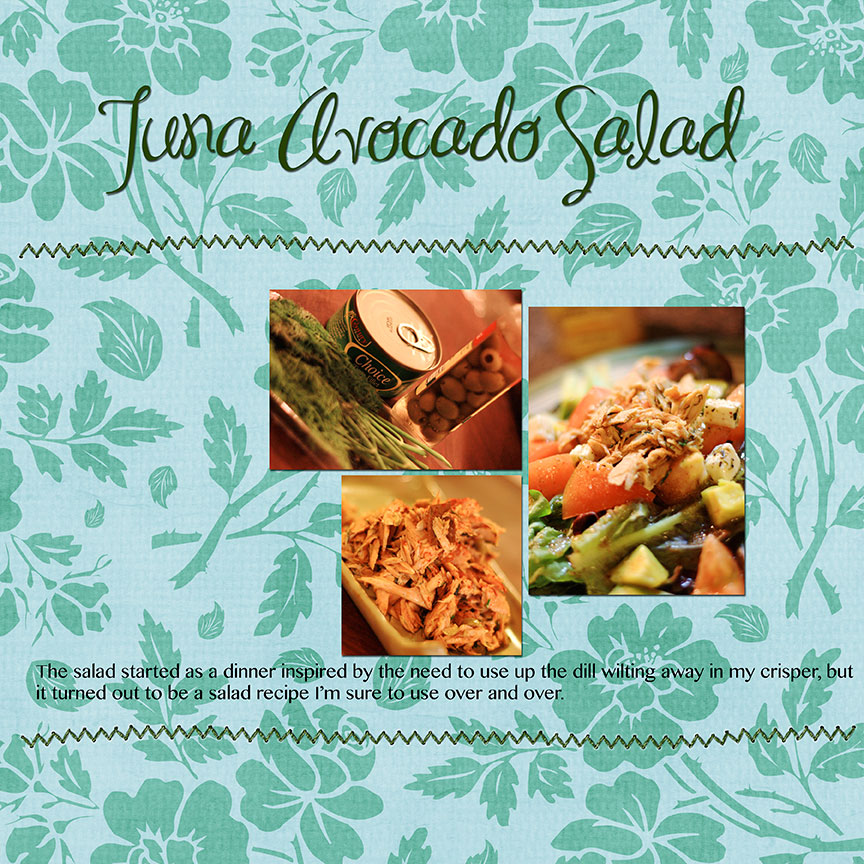
Do you ever use up all the herbs you buy? They tend to either dry up or wilt on me that I almost always have to throw away the left-overs (I know, I know… I can always freeze them – my excuse? I have yet to buy those ice trays). This salad was inspired by the need to use up the leftover dill I had wilting away on my crisper. And because canned tuna is my go to when I find myself in such a dilemma (see here and here), I obviously went that route again. And I am impressed with how this turned out, satisfying, hearty salad perfect as a main lunch or dinner meal.
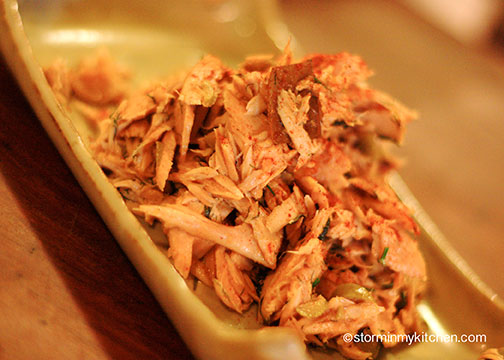
The tuna can be made ahead of time and kept for other uses, making this salad the easiest ever. This is something I will be making over and over during avocado season.
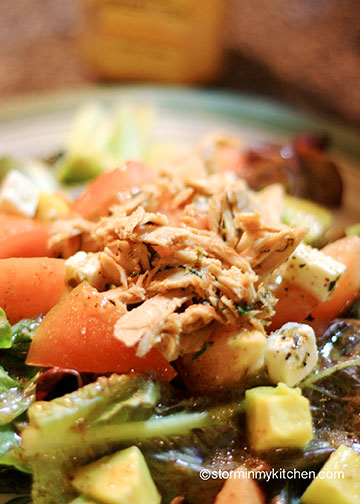
With avocado’s good for you fats and the high source of protein that tuna provides, this is not only the easiest thing ever but the benefits that these yields make this real winner on all aspect. Yes?
Tuna Avocado and Feta Salad
What You Need
For the tuna:
- 1 canned tuna packed in oil
- A few sprigs of dill, coarsely chopped
- 2 tablespoons sliced olives
- 1 teaspoon pimenton dulce or smoked paprika
For the dressing:
- 2 tablespoons freshly squeezed lemon juice
- 1 tablespoon balsamic vinegar
- 1 tablespoon Dijon mustard
- 3 tablespoon extra virgin olive oil
- Salt and pepper to taste
- Honey
For the Salad:
- Salad greens
- 1 ripe avocado, diced
- Feta cheese (I used the one marinated in olive oil and some herbs)
- 1 tomato, diced
What You Do:
- Drain tuna, flake apart slight with a fork and add to bowl with the chopped dill, olives, and the pimenton. Stir very gently to combine.
- Whisk together lemon juice, balsamic vinegar, Dijon mustard and a pinch of salt and cracked pepper on a small bowl until well combined. Add honey to taste and slowly whisk in olive oil until well combined.
- Arrange salad greens, topped with tuna, feta, avocado and tomatoes. Drizzle with dressing just to coat.
Summer Salad
May 10, 2014 § Leave a comment
We’re in the middle of summer and fruity salads are my thing of late.
Nectarines. I don’t see them often in my tropical world but once in a while I chance upon them. Like last week. And so before it get all mushy, I am on apricot overload. I’d bring have it for breakfast with cottage cheese (another thing I can’t live with but, unfortunately, Nestle decided to not sell them anymore and so I wait for this whenever available). But I digress. Of course, I have to have it on my salad.
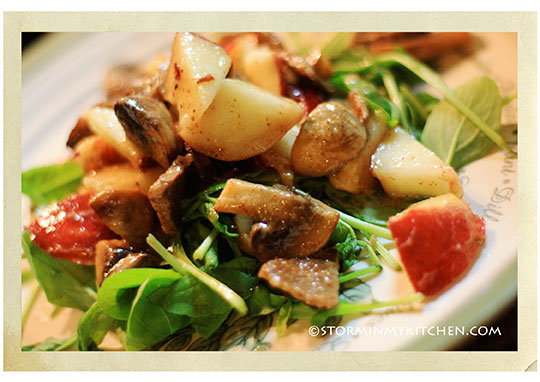
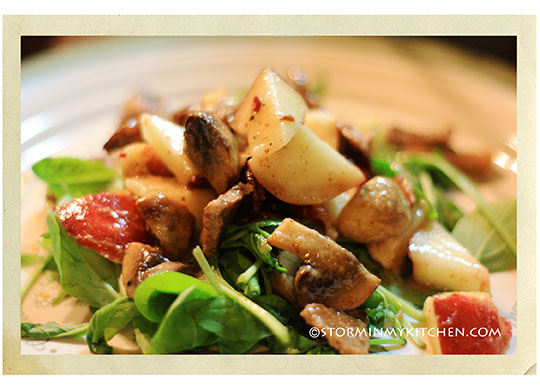
Nectarines and beef tapa is not surprisingly a winning combination. The sweet fragrant freshness of nectarines complement well with the salty, slightly sour beef. And the peppery, spicy arugula caps to the whole flavor adventure. Mangoes will be a good substitute I think for when nectarines or peaches aren’t in season.

Nectarine, Beef and Arugula Salad
What You Need:
o 50 grams of beef tapa, cut into strips (you can make your own or used this)
o A few button mushrooms, sliced
o 1 pcs. nectarine, quartered
o Arugula
o Salt and Pepper to taste
For the dressing:
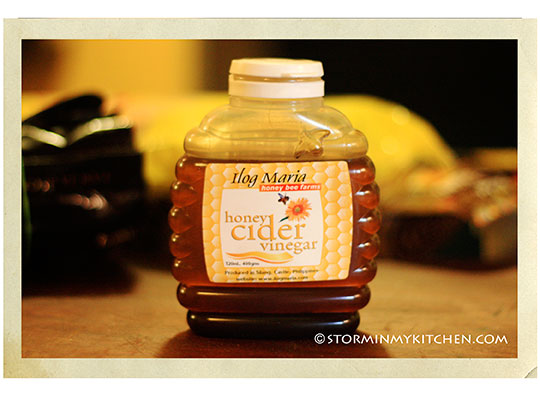
o ¼ cup Honey Cider Vinegar or Apple Cider Vinegar
o 1-2 tablespoon Extra Virgin Olive Oil
What You Do:
- On a frying pan, fry the beef until done. Set aside.
- On the same pan, leave just about a tablespoon of oil from the beef and discard the rest. Cook the mushrooms, season with salt and pepper.
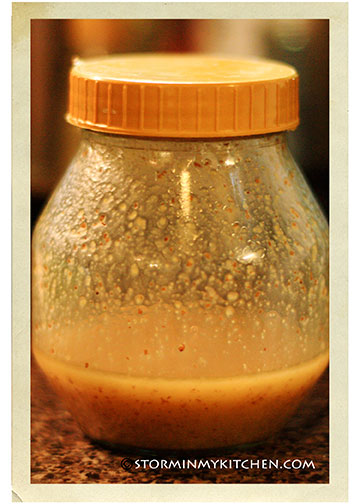
- Combine vinegar, olive oil, salt and pepper in a bottle with the cap closed tightly. Shake to combine.

- On a salad bowl, toss the nectarines, beef, mushrooms and arugula. Drizzle dressing on salad before serving.
Devastations and Tarte Tatins
December 2, 2013 § Leave a comment
Last month was a month of total devastation in my part of the world, devastation that is unexpected by many, me included. The most powerful tropical cyclone of the year hit our shores on November 8. Super typhoon Haiyan, locally known as Yolanda, smashed into most of the Visayas and some parts of Luzon in central Philippines, affecting more than 10 million people.

Survivors stand among debris and ruins of houses destroyed after Super Typhoon Haiyan battered Tacloban city in central Philippines November 10, 2013. Credits: Reuter: Erik de Castro
With winds that clocked in at average strength of 196 mph (314 kph), Yolanda’s rampage left a city and many islands in ruins, a population with no homes, and countless bodies still being found almost a month after.
I am writing this in the safety of my home, 850km away from the disaster zone. I shuddered at the thought of what it would have been like if it had hit the metropolis and I count my blessings. I do my best to help in every little way I can – donations, feeding the volunteers, and eventually feeding the survivors that found their way to Manila. Not enough, if you ask me, but what is enough?
This turn of events has left me heavy-hearted and shaken, and I turned to one thing that always calms me. I baked.

I’ve always wanted to make Tarte Tatins – a killer sticky sweet caramel-topped French treat that was originally made with apples. Many, through the years, have twisted the recipes to use different fruits – pears, bananas, peaches, pineapple – I chose to use guavas. Guavas are heavenly when preserved in sugar.

It is one of the easiest to make but likewise one of the hardest. This tart is made upside down by cooking the fruit in butter and sugar in a heavy-based oven-proof skillet, then topped with pastry before baking. That’s the easy part. The hard part is flipping the tart (down side up) without making a mess and burning oneself.

I used two large guavas, which, I think could use more. So depending on the size of the guavas, you may choose to use three large guavas.
Guava Tarte Tatin
(recipe adapted from Deb of Smitten Kitchen)What You Need:
- 2-3 large Guavas (I used Apple Guavas)
- Juice of half a lemon
- 6 tablespoons (85 grams) butter
- 1 1/3 cup (266 grams) sugar, divided
- Puffed pastry, chilled
- A 9-inch ovenproof skillet, heavy enough that you fear dropping it on your toes
What You Do:
- Peel guavas, cut lengthwise into quarters and core (you don’t want the seeds). Then cut a bevel along their inner edge, which will help their curved exteriors stay on top as they rest on this edge.
- Toss guavas with the lemon juice and 1/3 cup of the sugar. Set aside for 15 minutes to help release the guava’s juices.
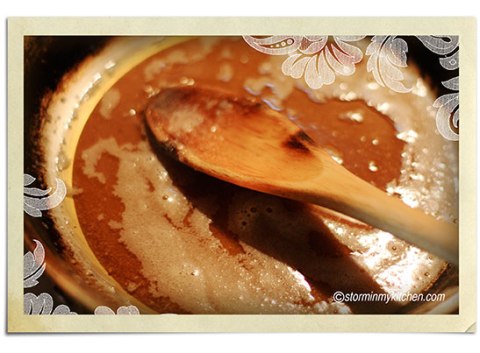
- Melt butter in an oven-proofed skillet over medium heat. Sprinkle in remaining (1 cup) sugar and whisk it over the heat until it becomes a pale caramel color.
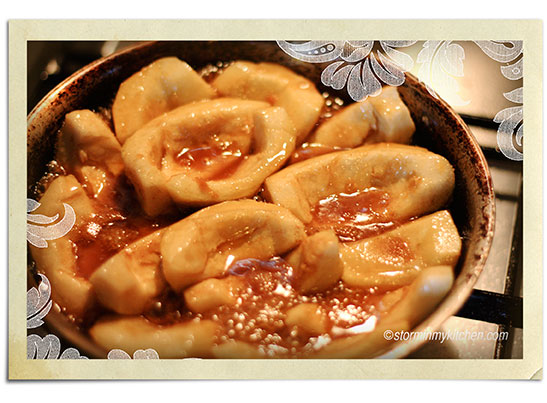
- Off the heat, add the guavas to the skillet, arranging them rounded sides down in one layer. Lay any more guava wedges left rounded sides down in a second layer, starting from the center.

- Return the pan to the stove and cook in the caramel for another 20 to 25 minutes over moderately high heat. With a spoon, regularly press down on the guavas and baste them with the caramel juices from the pan. If it seems that your guavas in the center are cooking faster, rotate guavas. The guavas will shrink a bit by the end of the cooking time.
- Preheat oven to 200°C (400°F). Roll out your puffed pastry to a 9-inch circle and trim if needed. Cut four vents in pastry. Remove skillet from heat again, and arrange pastry over guavas. Tuck it in around the guavas for nicer edges later. Bake until the pastry is puffed and golden brown, about 20 minutes.
- Once baked, use potholders to place a plate or serving dish (larger in diameter than the pan) over the pasty and tip over the pastry and guavas at once onto the plate. If any guavas remain in the pan, nudge them out with a spatula.
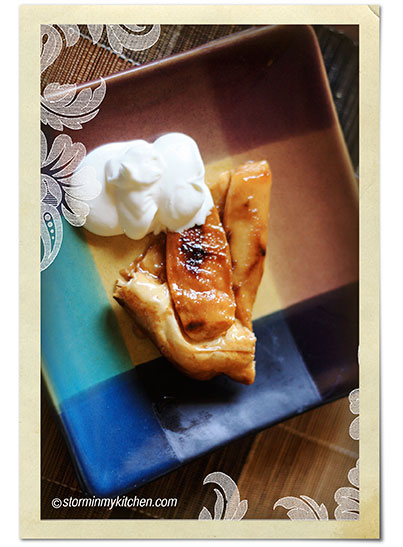
- Serve warm with a dollop of whipped crème fraîche, or lightly sweetened whipped cream.

Tips:
- Try other variations: bananas, pears, apples (of course) — although I haven’t tried making any of these yet.
- If you don’t have an oven-proofed pan, cook the fruit in a heavy based frying pan, then transfer them into a similar sized pie dish and top with pastry before baking.
- You can cook this one day ahead, keep it in the mold and reheat in a preheated oven at 150°C for 20 minutes but it is best 1 hour after cooking when still warm.
The Little Things in Life
October 16, 2012 § 1 Comment
More often what brings a smile to my face are the little things in life.

Beautiful blooms, the smell of coffee brewing in the morning, the whiff of fresh bread, a brand new day… So many things to be thankful for and those little things that life seems to take for granted are what we need to zoom in on.

I was up in Baguio for work recently and the cool weather was just perfect for a planning session. Freshly baked blueberry muffins, especially that of Baguio Country Club brings sunshine to my day. And sunshine always makes me smile. I love rain too for without it there would never be rainbows, yes? I love the sound of raindrops – it soothes my senses and makes me want to cozy up in my little corner with some hot tea

and this addictive lemon pie that can perk even the gloomiest person at one bite.

Using graham cracker crust makes it so easy to make – no need to labor over a traditional crust.

The touch of sweetness in the graham is a wonderful balance to the tart, lemony filling.

When life hands you lemons, lots of them, make lemon pie.

What makes you happy?
 Credits: Papers and elements from Scrap Matter’s Life Little Surprises kit. Alphas from Akiloune Designs

Lemon Pie
What you need:
- 10 graham crackers or 1 cup crushed
- 1/2 cup almonds or walnuts
- 6 tablespoons unsalted butter, room temperature
- 4 egg yolks
- 1 14-ounce can sweetened, condensed milk
- 1/2 cup lemon juice
- 2 teaspoons grated lemon zest
- Whipped cream for serving
What you do:
- Preheat the oven to 180ºC.
- Break the graham crackers into large pieces and place them in the bowl of your food processor. Pulse several times, until you have fine crumbs. Place the crumbs in a medium bowl. Alternatively, if you can find crushed graham crackers in your grocery store, use about 1 cup – it makes life so much simpler.
- Place the almonds in the food processor and pulse until they are finely chopped, then add them to the crumbs.
- Mix the butter with the crumb mixture until well blended, then press the mixture along the bottom and sides of a 9-inch pie pan.
- Bake the crust for about 12 minutes, until it’s lightly browned. Set the crust aside.
- Place the egg yolks in a bowl. Mix on medium until the yolks are pale yellow and slightly thickened, about two minutes.
- Reduce the speed to low and add the condensed milk. Slowly add the lemon juice, then turn off the mixer and stir in the lemon zest.

- Pour the mixture into the pie pan and bake for about 15 minutes, until the filling is almost set but still moist.
- Allow the pie to cool completely, then cover and refrigerate it for at least 8 hours. Serve with whipped cream.

 Enjoy!!
Small Bites: Bacon Wrapped Dates
August 23, 2012 § Leave a comment
 Credits: JSprague DIDer Course Material

When entertaining a modest sized group, say about 8-12 guests (more than that and I’ll need help in the kitchen), I like serving tapas. Many of the dishes would need very little preparation or cooking. I won’t have to slave it out in the kitchen and guests are given a variety to choose from. Load up on reds and whites and you’re good to go. A fun way to entertain and be entertained, if you ask me.
I’d usually prepare plates of olives, 3-4 kinds of cheese – 1 hard like Manchego and/or a not so hard like Gruyère, a soft cheese like brie, and I usually go for a cream cheese spread like Boursin. These are great to go with Jamon Serrano and sliced baguette. Chorizo, rendered in its own oil, are always present in my table too. Include a few heavy dishes – a pasta salad or a meat dish perhaps – and this takes care of filling up the tummy.

A friend sent me a box of honey dates from the Middle East. A nice snack it makes but I thought these would go better with bacon. Bacon wrapped dates – I once had this in a tapas bar and fell in love with it. Served this as part of my tapas selection recently and my friends loved it too.

This dish can be prepared ahead of time and cooked when guests arrive. The dates that are soaked in honey while easily caramelizes the bacon (so be careful not to burn), gives that added sweet contrast that makes this dish a winner in my books. Sweet, salty with a hint of smoky aroma… Yum!

Bacon Wrapped Dates
What You’ll Need
- Honey dates or dried dates
- Cashews
- Bacon strips
What You Do
- Slice dates lengthwise on one side to remove the pit.
- Fill the empty cavities of the dates with cashews.
- Push the sides together to close the dates up. Wrap a slice of bacon around each date and place them seam side down.

- Heat a small flat pan, preferably cast iron, on medium heat. Place the bacon wrapped dates, seam side down on the pan until the bottoms are brown and the seam is sealed.
- Turn and brown all the other sides. Serve immediately.

Avocado and Feta
August 1, 2012 § 1 Comment

I am obsessed with avocados at the moment. Partly because it is in season and I see them everywhere but mostly because I am loving its über creaminess on almost everything. It makes for a wonderful dessert when combined with condensed milk and have been greatly enjoying it for decades now. Some experimenting led me to a new discovery. Buttery avocado, sharp Feta cheese and peppery Arugula mingle well together. Finish off with some sliced fresh button mushrooms and honey-mustard dressing and they end up very good friends.

I’ve been occupied lately and I’m afraid I’ve neglected this blog a bit. But I’ve been working up a storm in my kitchen despite my absence here. In between work and travelling, I’ve been entertaining on the side so may this whet your appetite, as salads always do, for what’s to come.

Arugula, Avocado and Feta Salad
What You Need:
For the Vinaigrette:
- 1 tablespoon Dijon mustard
- 3 tablespoons Apple Cider Vinegar
- ½ tablespoon honey
- ½ teaspoon salt
- 5 tablespoons olive oil
For the Salad
- Baby arugula
- 1 medium avocado, cut into ½-inch cubes
- ½ cup crumbled Greek feta cheese marinated in oil
- 4-5 pieces fresh button mushrooms, sliced
What You Do:
In a small bowl, combine mustard, vinegar, honey and salt. Whisk to blend well. Add olive oil and whisk vigorously to emulsify. Adjust according to your taste.

Mix salad ingredients together and toss with vinaigrette. Makes 3-4 serving.
Note: I like using baby arugula but if this is hard to find, the regular ones are good too. Feta cheese can be substituted with goat cheese. Left over roast chicken torn into bite-sized pieces goes well with the salad, as is tuna from the can.
An Adult Take on a Childhood Favorite
March 23, 2012 § 14 Comments
We used to live in a compound. It has four houses, the main house was my lola’s (grandmother’s), one was our house and the two others were my father’s siblings’. We lived there most of my life until we moved house after college. There were so many memories in that compound but summers (as a child) were especially memorable as the days were spent playing with cousins in that compound – patintero, touch-taya, Chinese garter… there even was a baseball phase. I remember catching tadpoles at the canal outside our house. Yeah those were carefree times. I can’t imagine any parent allowing their kids to play in a canal today. 😯 We’d climb and pick santol and indian mangoes from the tree in my lola’s garden, devouring it with salt or toyo (soysauce). I’d always look forward to my uncle’s treats to Sunshine Market, our neighborhood grocery. I’d go straight to the snack section and pick-up Carol-Ann’s potato chips. Oh how I love that greasy but crispy, thin chips seasoned only with salt. To this day, nothing beats Carol-Ann’s and you don’t find them anymore. I love Choco vim — I’d shake it till the chocolate at the bottom dissolves, such a thrill . And there was Magnolia’s Twin Popsies, I like both the chocolate and the orange variant. A perfect heat quencher. Childhood memories… always make me smile.
The Kulinarya Cooking Club is a club that showcases Filipino dishes by way of a monthly challenge among the members. And this is my first attempt on a fairly easy but so much fun challenge this month, thanks to Arnold of Inuyaki and Jun of Jun-blog.

The theme is “ice candy” or popsicle treats, which aptly signals the start of summer. In spite of the heat, summer is always a favorite time of the year. It means I get to soak up the sun in some remote island with some frozen delights on hand. I usually go for fresh shakes nowadays but ice candy brought back so many memories that I feel like having twin popsies right now.

My take on the theme is an adult version of a childhood favorite. I made 2 versions in honor of the 2 Magnolia Twin Popsies variants. One is a delightful orange and mango flavor with a hint of ginger while the other is a chocolate popsicle made of native cacao balls and since I love a hint of orange in my chocolate, I added some orange zest to give it a twist.
Mango-Orange-Ginger Popsies

What you need:
- 3-4 pcs. Navel oranges
- 2-3 pcs. Ripe Philippine mangoes
- 3-4 slices of ginger
- ¼ cup sugar
- A dash of Cinnamon powder or stick
What you do:
- To make the ginger syrup: In a pot, dissolve sugar with ½ cup water. Add ginger slices and cinnamon stick. Bring to a boil.

- Meanwhile make into juice all the oranges and 1 mango*. Combine orange/mango juice and the ginger syrup in a pitcher (for ease in pouring).

- Slice the rest of the mangoes into bite-sized pieces distribute in popsicle molds**.
- Pour the juice mixture. Place popsicle sticks over the mold and freeze.


Notes:
* You may use ready to drink juices too if desired. About 2 cups of orange juice to 1 cup of mango.
** The frozen mango makes a lot of different so fill it to the bream and then pour the juice.
Orange-flavored Choco Frozen Delight

What you need:
- 10 balls or more of native chocolate*
- 2 cups water
- 1 tsp orange zest
- A dash of cinnamon powder or stick
What you do:
- Dissolve choco balls in water, adding more depending on desired thickness.**
- Add a dash of cinnamon or place the stick of cinnamon while cooking the chocolate.
- When chocolate is ready, add the zest before turning off heat.
- Strain into a pitcher and let cool.
- Pour into popsicle molds, place popsicle sticks and freeze.

Notes:
* Native chocolates are made differently; it is best that you know what kind you’re using or follow instructions if it they have it.
** The thicker the chocolate, the richer the popsicle. If you make it thick enough, it is like biting into a frozen chocolate bar.
Both were delightfully refreshing. At the last-minute I decided to add the mango on the orange version and did a happy dance when I bit into the finish product. It really made a lot of difference biting into frozen mangoes. The ginger is a great twist to a familiar flavor. Makes sure though not to overdo the ginger or it will overpower the light fruity flavor.

The chocolate version, on the hand is less sweet and much richer than that of Magnolia’s. The orange zest added a fruity dimension to dark chocolate. I intentionally didn’t add milk or cream, as I wanted it dark. If milk chocolate is the preference, go ahead and add a bit of cream.
If you don’t have a popsicle mold, you may use disposable cups. To hold the sticks in place, tape over a plastic wrap and bore a hole in the middle where the stick will go. This will make the stick stay in the middle.
Stay cool everyone!
Blueberry Trifle
June 28, 2011 § 3 Comments
I gravitate towards desserts that have fruit on it and blueberries are an absolute favorite. On my recent trip to Sagada, they were in season and I got around 4 cups worth of blueberries and wished I got more. These wild berries lack sweetness and the skin is on the tart side when eaten fresh. Make them into a jam or in my case, compote and they are to die for. Lovely on yogurt or pancakes.

With the remaining compote, I made trifle. I initially used store-bought rum cake in lieu of sponge cake. It was either the cake was too dense and didn’t soak up the blueberry sauce or pound cakes are just too heavy for a trifle. It was dry and heavy. I also omitted the Grand Marnier because I didn’t have any.

Credits: Quickpage by K Pertiet
So on my 2nd attempt, I used broas, our local ladyfingers, which is airy and light. I liked this version better. Lighter and fruitier. I remembered that I had a 2 cl bottle of Kirsch, it was fabulous. It added a dimension to the trifle and actually brought out the flavor of the berries. What came out was a light enough fruity dessert to end a similarly light meal of fish or chicken.
Blueberry Trifle
(Adapted from Joy of Baking)
What you need:
- 8-10 ladyfingers (depending on its size)
- 1 tablespoon Kirsch
- 1 cup Blueberry compote or sauce
- 1 cup heavy whipping cream
- 2-3 tablespoons granulated white sugar
- 2/3 cup Mascarpone cheese
- 1 teaspoon pure vanilla extract
- 4-5 crushed Amaretti cookies
What you do:
For the Mascarpone Cream:
- Place the heavy cream, mascarpone, sugar, and vanilla extract in a large bowl. Whip until soft peaks form.
To Assemble:
- Arrange ladyfingers in the bottom of a clear glass bowl or trifle glass (if you have).
- Sprinkle ladyfingers with about 1 teaspoon of the spirit.
- Spoon about 1-2 tablespoons of the blueberry compote/sauce on top of the ladyfingers.
- Cover the sauce with a few of the fresh blueberries.
- Place a large dollop of the mascarpone cream mixture on top of the berries.
- Repeat the layers, starting with lady fingers.
- Cover and refrigerate for 4-24 hours to allow the flavors to mingle.
- Just before serving, sprinkle with some crushed Amaretti cookies. It will give it a good crunch.
Serves 4-6
